流水线
前面我们的两个任务 test 和 build-and-push 都已经完成了,我们还可以创建一个流水线来将这两个任务组织起来,形成一个流水线,这里就是我们要使用的 Pipeline 这个 CRD 对象。
创建流水线
比如我们这里的流水线流程为先运行 test 任务,如果通过了再执行后面的 build-and-push 这个任务,那么我们可以创建一个名为 test-pipeline.yaml 的资源对象,内容如下所示:
# test-pipeline.yaml
apiVersion: tekton.dev/v1beta1
kind: Pipeline
metadata:
  name: test-pipeline
spec:
  resources: # 为 Tasks 提供输入和输出资源声明
    - name: git-res
      type: git
    - name: harbor-image
      type: image
  tasks: # 添加task到流水线中
    # 运行应用测试
    - name: test
      taskRef:
        name: test
      resources:
        inputs:
          - name: repo # Task 输入名称
            resource: git-res # Pipeline 资源名称
    # 构建并推送 Docker 镜像
    - name: build-and-push
      taskRef:
        name: build-and-push
      runAfter:
        - test # 测试任务执行之后
      resources:
        inputs:
          - name: repo # 指定输入的git仓库资源
            resource: git-res
        outputs: # 指定输出的镜像资源
          - name: builtImage
            resource: harbor-image
首先我们需要定义流水线需要哪些资源,可以是输入或者输出的资源,在这里我们只有一个输入,那就是命名为 repo 的应用程序源码的 GitHub 仓库。接下来定义任务,每个任务都通过 taskRef 进行引用,并传递任务需要的输入参数。
同样直接创建这个资源对象即可:
$ kubectl apply -f test-pipeline.yaml
pipeline.tekton.dev/test-pipeline created
前面我们提到过和通过创建 TaskRun 去触发 Task 任务类似,我们可以通过创建一个 PipelineRun 对象来运行流水线。这里我们创建一个名为 test-pipelinerun.yaml 的 PipelineRun 对象来运行流水线,文件内容如下所示:
# test-pipelinerun.yaml
apiVersion: tekton.dev/v1beta1
kind: PipelineRun
metadata:
  name: test-pipelinerun
spec:
  serviceAccountName: build-sa # 关联带有认证信息的 ServiceAccount
  pipelineRef:
    name: test-pipeline
  resources:
    - name: git-res # 指定输入的git仓库资源
      resourceRef:
        name: git-res
    - name: harbor-image # 指定输出的镜像资源
      resourceRef:
        name: harbor-image
定义方式和 TaskRun 几乎一样,通过 serviceAccountName 属性指定 ServiceAccount 对象,pipelineRef 关联流水线对象。同样直接创建这个资源,创建后就会触发我们的流水线任务了:
$ kubectl apply -f test-pipelinerun.yaml
pipelinerun.tekton.dev/test-pipelinerun created
$ kubectl get pods | grep test-pipelinerun
test-pipelinerun-build-and-push-pod   0/4     Completed   0              47s
test-pipelinerun-test-pod             0/2     Completed   0              58s
$ tkn pipelinerun describe test-pipelinerun
Name:              test-pipelinerun
Namespace:         default
Pipeline Ref:      test-pipeline
Service Account:   build-sa
Timeout:           1h0m0s
Labels:
 tekton.dev/pipeline=test-pipeline

🌡️  Status

STARTED          DURATION   STATUS
34 seconds ago   23s        Succeeded

📦 Resources

 NAME             RESOURCE REF
 ∙ git-res        git-res
 ∙ harbor-image   harbor-image

🗂  Taskruns

 NAME                                TASK NAME        STARTED          DURATION   STATUS
 ∙ test-pipelinerun-build-and-push   build-and-push   23 seconds ago   12s        Succeeded
 ∙ test-pipelinerun-test             test             34 seconds ago   11s        Succeeded
到这里证明我们的流水线执行成功了,同样在 Dashboard 上也可以看到相关信息。
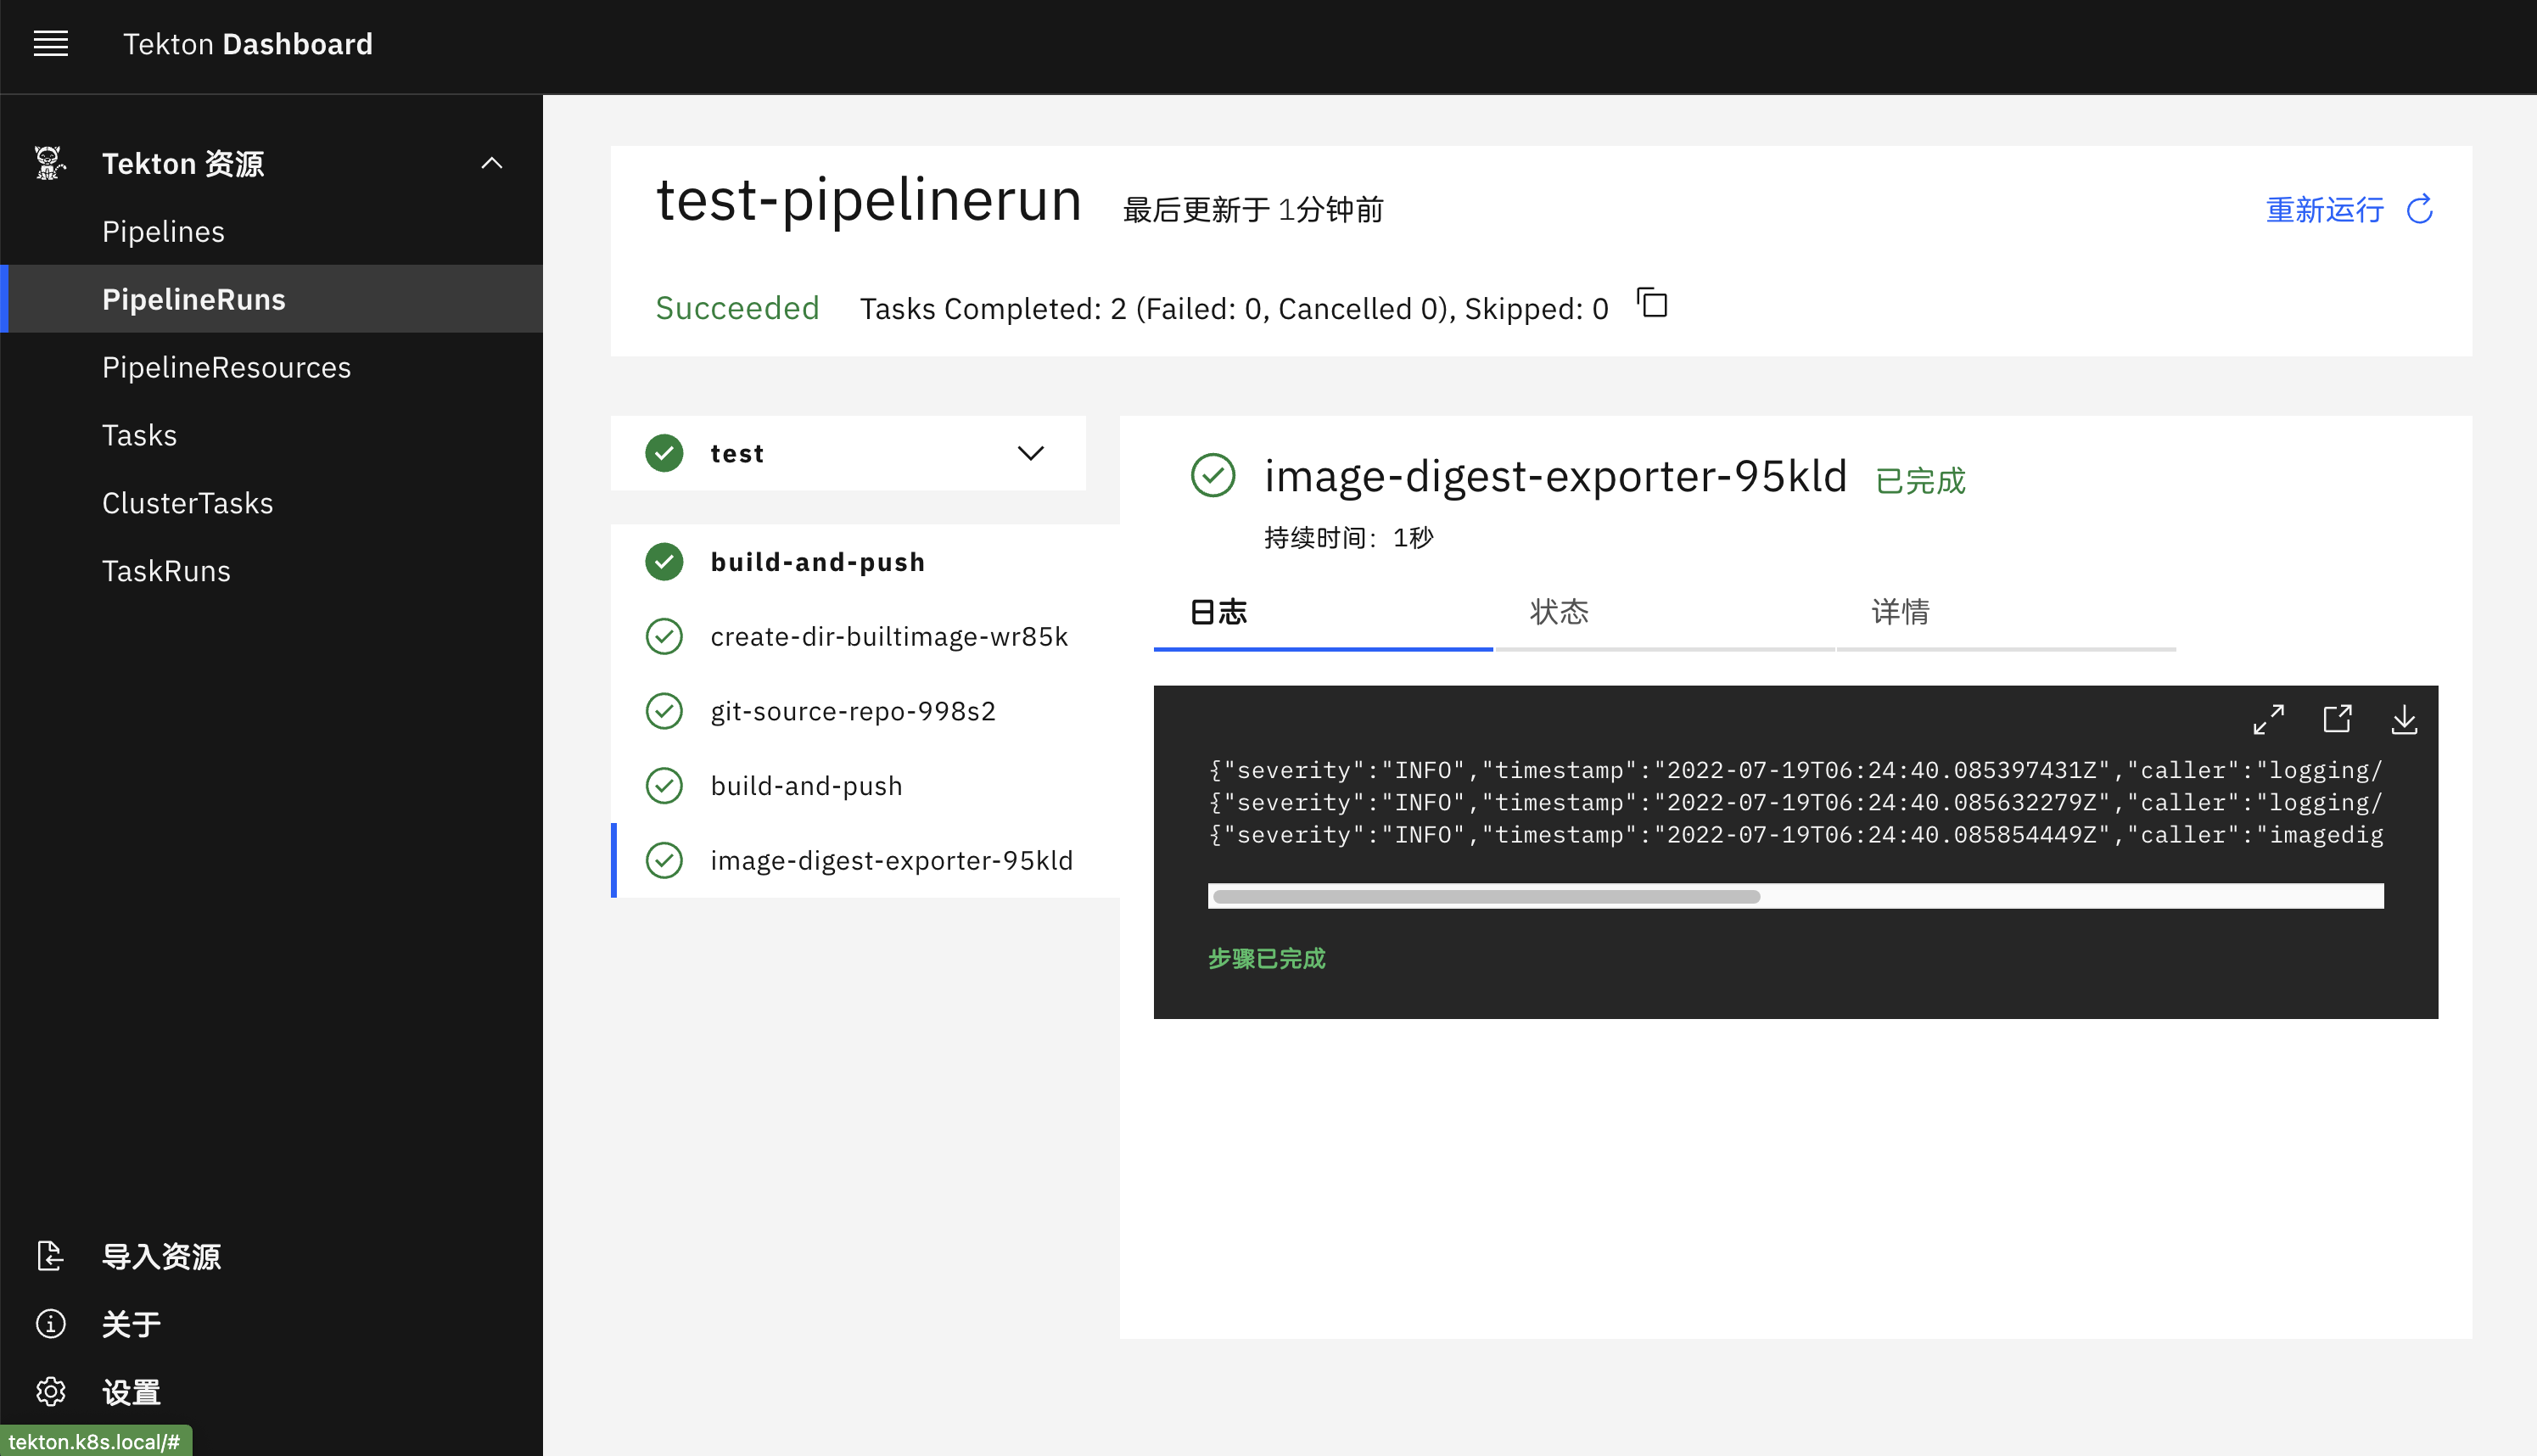
我们将 Tekton 安装在 Kubernetes 集群上,定义了一个 Task,并通过 YAML 清单和 Tekton CLI 创建 TaskRun 对其进行了测试。我们创建了由两个任务组成的 Tekton 流水线,第一个任务是从 GitHub 克隆代码并运行应用程序测试,第二个任务是构建一个 Docker 镜像并将其推送到 Docker Hub 上。
使用 Results 传递数据
上面我们在构建镜像的时候可以看到镜像的 TAG 我们是写死的,或者需要在每次执行的时候通过参数传递进去,比较麻烦,那么有没有什么办法可以自动生成镜像 TAG 呢?比如根据时间戳来生成一个构建的 ID。
这里我们可以通过定义一个 Task 任务,然后通过 script 脚本去获取到数据后传入到 results 中去,我们可以把这些 results 数据传递到流水线中的其他任务中去,比如我们想要获取 git commit 的 SHA 值,或者生成一个随机的 ID 来作为镜像 TAG,比如这里我们创建一个名为 generate-build-id 的 Task 任务,定义了 get-timestamp 和 get-buildid 两个 Steps,一个用于生成时间戳,一个用于生成一个包含基本版本的结果值,将结果添加到 results 中去。
# generate-build-id.yaml
apiVersion: tekton.dev/v1beta1
kind: Task
metadata:
  name: generate-build-id
spec:
  description: >-
    Given a base version, this task generates a unique build id by appending
    the base-version to the current timestamp.
  params:
    - name: base-version
      description: Base product version
      type: string
      default: '1.0'
  results:
    - name: timestamp
      description: Current timestamp
    - name: build-id
      description: ID of the current build
  steps:
    - name: get-timestamp
      image: bash:5.0.18
      script: |
        #!/usr/bin/env bash
        ts=`date "+%Y%m%d-%H%M%S"`
        echo "Current Timestamp: ${ts}"
        echo ${ts} | tr -d "\n" | tee $(results.timestamp.path)
    - name: get-buildid
      image: bash:5.0.18
      script: |
        #!/usr/bin/env bash
        ts=`cat $(results.timestamp.path)`
        buildId=$(inputs.params.base-version)-${ts}
        echo ${buildId} | tr -d "\n" | tee $(results.build-id.path)
直接创建上面的 Task:
$ kubectl apply -f generate-build-id.yaml
task.tekton.dev/generate-build-id created
创建完成后,现在我们就可以在 Pipeline 中来使用这个 Task 了,用来生成构建 ID,修改 test-pipeline.yaml,增加 generate-build-id 任务:
# test-pipeline.yaml
apiVersion: tekton.dev/v1beta1
kind: Pipeline
metadata:
  name: test-pipeline
spec:
  resources: # 为 Tasks 提供输入和输出资源声明
    - name: git-res
      type: git
    - name: harbor-image
      type: image
  params:
    - name: image-tag
      type: string
  tasks: # 添加task到流水线中
    # 运行应用测试
    - name: test
      taskRef:
        name: test
      resources:
        inputs:
          - name: repo # Task 输入名称
            resource: git-res # Pipeline 资源名称
    - name: get-build-id
      taskRef:
        name: generate-build-id
      params:
        - name: base-version
          value: $(params.image-tag)
    # 构建并推送 Docker 镜像
    - name: build-and-push
      taskRef:
        name: build-and-push
      runAfter:
        - test # 测试任务执行之后
        - get-build-id
      resources:
        inputs:
          - name: repo # 指定输入的git仓库资源
            resource: git-res
        outputs: # 指定输出的镜像资源
          - name: builtImage
            resource: harbor-image
      params:
        - name: imageTag
          value: '$(tasks.get-build-id.results.build-id)'
然后在 build-and-push 任务中通过 "$(tasks.get-build-id.results.build-id)" 获取构建的 ID,将这个 ID 作为参数传入任务中去,所以我们也需要在 build-and-push 任务中增加 build-id 这个参数:
# task-build-push.yaml
apiVersion: tekton.dev/v1beta1
kind: Task
metadata:
  name: build-and-push
spec:
  resources:
    inputs: # 定义输入资源
      - name: repo #输入资源,就是github的那个仓库
        type: git
    outputs: # 定义输出资源
      - name: builtImage # 输出镜像名字
        type: image
  params:
    - name: pathToDockerfile #指明 dockerfile 在仓库中的哪个位置
      type: string
      default: $(resources.inputs.repo.path)/Dockerfile # repo资源的路径
      description: The path to the dockerfile to build
    - name: pathToContext #指明 dockerfile 在仓库中的哪个位置
      type: string
      default: $(resources.inputs.repo.path) # repo资源的路径
      description: the build context used by docker daemon
    - name: imageTag
      type: string
      default: 'v0.2.0'
      description: the docker image tag
  steps:
    - name: build-and-push
      image: docker:stable
      script: |
        #!/usr/bin/env sh
        docker login harbor.k8s.local
        docker build -t $(resources.outputs.builtImage.url):$(params.imageTag) -f $(params.pathToDockerfile) $(params.pathToContext)
        docker push $(resources.outputs.builtImage.url):$(params.imageTag)  # 这边的参数都是在 input 和 output 中定义的
      env:
        - name: DOCKER_HOST
          value: tcp://docker-dind.kube-ops:2375
然后需要将 builtImage 这个 output 资源的 url 定义中将镜像 tag 去掉,在 PipelineRun 对象中新增 image-tag 的参数:
# test-pipelinerun.yaml
apiVersion: tekton.dev/v1beta1
kind: PipelineRun
metadata:
  name: test-pipelinerun
spec:
  serviceAccountName: build-sa
  pipelineRef:
    name: test-pipeline
  resources:
    - name: git-res # 指定输入的git仓库资源
      resourceRef:
        name: git-res
    - name: harbor-image # 指定输出的镜像资源
      resourceRef:
        name: harbor-image
  params:
    - name: image-tag
      value: 'v0.3.0'
另外要记得将 harbor-image 这个 PipelineResource 的 url 参数值去掉镜像 tag:
# harbor-image-res.yaml
apiVersion: tekton.dev/v1alpha1
kind: PipelineResource
metadata:
  name: harbor-image
spec:
  type: image
  params:
    - name: url
      value: harbor.k8s.local/course/tekton-demo
所有修改完成后,重新执行我们的整个流水线即可。
$ tkn pipelinerun logs test-pipelinerun
[get-build-id : get-timestamp] Current Timestamp: 20220719-064312
[get-build-id : get-timestamp] 20220719-064312

[get-build-id : get-buildid] v0.3.0-20220719-064312

[test : git-source-repo-s7wcd] {"level":"warn","ts":1658212992.0961232,"caller":"git/git.go:273","msg":"URL(\"https://github.91chi.fun/https://github.com/cnych/tekton-demo.git\") appears to need SSH authentication but no SSH credentials have been provided"}
[test : git-source-repo-s7wcd] {"level":"info","ts":1658212994.7583172,"caller":"git/git.go:178","msg":"Successfully cloned https://github.91chi.fun/https://github.com/cnych/tekton-demo.git @ 5e1e3a1d0f167b9b639df5b802a0f0f81064d21e (grafted, HEAD, origin/master) in path /workspace/repo"}
[test : git-source-repo-s7wcd] {"level":"info","ts":1658212994.774911,"caller":"git/git.go:217","msg":"Successfully initialized and updated submodules in path /workspace/repo"}

[test : run-test] PASS
[test : run-test] ok    _/workspace/repo        0.002s

[build-and-push : create-dir-builtimage-hbn8r] 2022/07/19 06:43:19 warning: unsuccessful cred copy: ".docker" from "/tekton/creds" to "/home/nonroot": unable to create destination directory: mkdir /home/nonroot: permission denied

[build-and-push : git-source-repo-sh7zv] {"level":"warn","ts":1658213001.0883648,"caller":"git/git.go:273","msg":"URL(\"https://github.91chi.fun/https://github.com/cnych/tekton-demo.git\") appears to need SSH authentication but no SSH credentials have been provided"}
[build-and-push : git-source-repo-sh7zv] {"level":"info","ts":1658213006.4922543,"caller":"git/git.go:178","msg":"Successfully cloned https://github.91chi.fun/https://github.com/cnych/tekton-demo.git @ 5e1e3a1d0f167b9b639df5b802a0f0f81064d21e (grafted, HEAD, origin/master) in path /workspace/repo"}
[build-and-push : git-source-repo-sh7zv] {"level":"info","ts":1658213006.5069387,"caller":"git/git.go:217","msg":"Successfully initialized and updated submodules in path /workspace/repo"}

[build-and-push : build-and-push] Authenticating with existing credentials...
[build-and-push : build-and-push] WARNING! Your password will be stored unencrypted in /root/.docker/config.json.
[build-and-push : build-and-push] Configure a credential helper to remove this warning. See
[build-and-push : build-and-push] https://docs.docker.com/engine/reference/commandline/login/#credentials-store
[build-and-push : build-and-push]
[build-and-push : build-and-push] Login Succeeded
[build-and-push : build-and-push] Sending build context to Docker daemon  157.7kB
[build-and-push : build-and-push] Step 1/6 : FROM golang:1.14-alpine
[build-and-push : build-and-push]  ---> 32dc91e030ac
# ......
[build-and-push : build-and-push] c1f81aac25d2: Pushed
[build-and-push : build-and-push] v0.3.0-20220719-064312: digest: sha256:36e2333b77e890f4120f844b39e11df64140821a0814c15c0e4ee18c80caa8bf size: 2198

[build-and-push : image-digest-exporter-8npsc] {"severity":"INFO","timestamp":"2022-07-19T06:43:31.247211063Z","caller":"logging/config.go:116","message":"Successfully created the logger."}
[build-and-push : image-digest-exporter-8npsc] {"severity":"INFO","timestamp":"2022-07-19T06:43:31.247263791Z","caller":"logging/config.go:117","message":"Logging level set to: info"}
[build-and-push : image-digest-exporter-8npsc] {"severity":"INFO","timestamp":"2022-07-19T06:43:31.247373395Z","caller":"imagedigestexporter/main.go:59","message":"No index.json found for: builtImage","commit":"19940f2"}
我们可以看到在 get-build-id 任务中为我们生成了 v0.3.0-20210617-125634 这样的镜像 TAG,最后也通过 results 传递到了下面的构建任务中去,镜像的 TAG 也更新了。

Tekton Catalog
当然这些任务其实都具有一定的通用性的,为此 Tekton 官方提供了一个 Catalog 的服务,用来专门提供一些通用的任务,比如我们想要获取 Git Commit 的相关信息,可以使用 https://artifacthub.io/packages/tekton-task/tekton-catalog-tasks/git-clone 这个 Catalog,文档中也包含相关的使用说明。Tekton 官方也提供了一个 Tekton Hub 网站来分享一些 Catalog 服务。
到这里我们就完成了使用 Tekton 创建 CI/CD 流水线的一个简单示例,不过这个示例还比较简单。
Sidecar
在 Tekton 中还有一项功能就是 Sidecar,和 Pod 中的 Sidecar 类似,它也是一个容器,用于和 Task 任务的 Steps 中指定的容器一起运行,为这些 Steps 的执行提供一些辅助支持,比如 Sidecar 可以运行一个 logging daemon、更新共享 volume 上的文件或者提供网络代理等功能。
Tekton 会将 Sidecar 注入属于 TaskRun 的 Pod,一旦 Task 中的所有 Steps 完成执行,Pod 内运行的每一个 Sidecar 就会终止掉,如果 Sidecar 成功退出,kubectl get pods 命令会将 Pod 的状态返回为 Completed,如果 Sidecar 退出时出现了错误,则返回 Error,而忽略实际执行 Pod 内部 Steps 的容器镜像的退出码值。
以前我们在构建容器镜像的时候是通过挂载宿主机的 docker.sock 文件到容器中来执行的(上面我们是通过 DOCKER_HOST 环境变量来指定 Daemon 地址),严格意义上来说这种方式叫 Dood - Docker Outside of Docker,DooD 通过绑定安装 Docker 套接字来使用其底层宿主机的 Docker Daemon,而真正的 DinD 是在其中包含一个完整的 Docker 服务。显然 DooD 这种方式更快,因为可以利用它的缓存机制,而 DinD 显然更加安全、更加干净,对宿主机产生的影响更小,而且支持并行运行,因为每个容器里面都是一个独立的 Docker Daemon,互相不受影响,当然 DooD 更加简单易用。这里我们就来使用 Sidecar 的方式为 Tekton 中的容器构建提供一个 DinD 模式的构建服务。
新建一个如下所示的 Task 任务,专门用来构建 Docker 镜像:
# task-docker-build.yaml
apiVersion: tekton.dev/v1beta1
kind: Task
metadata:
  name: docker-build-push
spec:
  resources:
    inputs: # 定义输入资源
      - name: source # 源代码仓库
        type: git
  params:
    - name: image
      description: Reference of the image docker will produce.
    - name: builder_image
      description: The location of the docker builder image.
      default: docker:stable
    - name: dockerfile
      description: Path to the Dockerfile to build.
      default: ./Dockerfile
    - name: context
      description: Path to the directory to use as context.
      default: .
    - name: build_extra_args
      description: Extra parameters passed for the build command when building images.
      default: ''
    - name: push_extra_args
      description: Extra parameters passed for the push command when pushing images.
      default: ''
    - name: insecure_registry
      description: Allows the user to push to an insecure registry that has been specified
      default: ''
    - name: registry_mirror
      description: Specific the docker registry mirror
      default: ''
    - name: registry_url
      description: private docker images registry url
  steps:
    - name: docker-build # 构建步骤
      image: $(params.builder_image)
      env:
        - name: DOCKER_HOST # 用 TLS 形式通过 TCP 链接 sidecar
          value: tcp://localhost:2376
        - name: DOCKER_TLS_VERIFY # 校验 TLS
          value: '1'
        - name: DOCKER_CERT_PATH # 使用 sidecar 守护进程生成的证书
          value: /certs/client
      workingDir: $(resources.inputs.source.path)
      script: | # docker 构建命令
        docker login $(params.registry_url)
        docker build \
          $(params.build_extra_args) \
          --no-cache \
          -f $(params.dockerfile) -t $(params.image) $(params.context)
      volumeMounts: # 声明挂载证书目录
        - mountPath: /certs/client
          name: dind-certs
    - name: docker-push #
      image: $(params.builder_image)
      env:
        - name: DOCKER_HOST
          value: tcp://localhost:2376
        - name: DOCKER_TLS_VERIFY
          value: '1'
        - name: DOCKER_CERT_PATH
          value: /certs/client
      workingDir: $(resources.inputs.source.path)
      script: | # 推送 docker 镜像
        docker push $(params.push_extra_args) $(params.image)
      volumeMounts:
        - mountPath: /certs/client
          name: dind-certs
  sidecars: # sidecar 模式,提供 docker daemon服务,实现真正的 DinD 模式
    - image: docker:dind
      name: server
      args:
        - --storage-driver=vfs
        - --userland-proxy=false
        - --debug
        - --insecure-registry=$(params.insecure_registry)
        - --registry-mirror=$(params.registry_mirror)
      securityContext:
        privileged: true
      env:
        - name: DOCKER_TLS_CERTDIR # 将生成的证书写入与客户端共享的路径
          value: /certs
      volumeMounts:
        - mountPath: /certs/client
          name: dind-certs
      readinessProbe: # 等待 dind daemon 生成它与客户端共享的证书
        periodSeconds: 1
        exec:
          command: ['ls', '/certs/client/ca.pem']
  volumes: # 使用 emptyDir 的形式即可
    - name: dind-certs
      emptyDir: {}
上面的 Task 最重要的就是其中的 sidecars 部分,使用了一个 docker:dind 镜像来提供 docker 服务端,由于是 sidecar 模式,所以它和上面构建的 steps 中的容器是共享 network namespace 的,所以在构建的时候我们可以通过 tcp://localhost:2376 和 docker 服务端进行通信,由于还使用的是 TLS 证书模式,所以需要将证书目录进行声明挂载。
接着重新修改我们的 Pipeline 流水线:
# test-pipeline.yaml
apiVersion: tekton.dev/v1beta1
kind: Pipeline
metadata:
  name: test-sidecar-pipeline
spec:
  resources: # 为 Tasks 提供输入和输出资源声明
    - name: git-res
      type: git
  params:
    - name: image
      type: string
    - name: image-tag
      type: string
      default: 'v0.4.0'
    - name: registry_url
      type: string
      default: 'harbor.k8s.local'
    - name: registry_mirror
      type: string
      default: 'https://ot2k4d59.mirror.aliyuncs.com/'
    - name: insecure_registry
      type: string
      default: 'harbor.k8s.local'
  tasks: # 添加task到流水线中
    # 运行应用测试
    - name: test
      taskRef:
        name: test
      resources:
        inputs:
          - name: repo # Task 输入名称
            resource: git-res # Pipeline 资源名称
    - name: get-build-id
      taskRef:
        name: generate-build-id
      params:
        - name: base-version
          value: $(params.image-tag)
    # 构建并推送 Docker 镜像
    - name: build-and-push
      taskRef:
        name: docker-build-push # 使用上面定义的镜像构建任务
      runAfter:
        - test # 测试任务执行之后
      resources:
        inputs:
          - name: source # 指定输入的git仓库资源
            resource: git-res
      params:
        - name: image
          value: '$(params.image):$(tasks.get-build-id.results.build-id)'
        - name: registry_url
          value: $(params.registry_url)
        - name: insecure_registry
          value: $(params.insecure_registry)
        - name: registry_mirror
          value: $(params.registry_mirror)
这里的流水线最重要的就是将镜像构建的任务替换成上面的 docker-build-push 这个 Task,然后传入几个需要的参数,接着修改 PipelineRun:
apiVersion: tekton.dev/v1beta1
kind: PipelineRun
metadata:
  name: test-sidecar-pipelinerun
spec:
  serviceAccountName: build-sa
  pipelineRef:
    name: test-sidecar-pipeline
  resources:
    - name: git-res # 指定输入的git仓库资源
      resourceRef:
        name: git-res
  params:
    - name: image
      value: harbor.k8s.local/course/tekton-demo
这里就比较简单了,只需要引用上面的 Pipeline 流水线,然后提供需要的几个参数即可,直接创建上面的几个资源对象即可执行我们的流水线了:
$ tkn pr list
NAME                       STARTED         DURATION     STATUS
test-sidecar-pipelinerun   3 minutes ago   2 minutes    Succeeded
test-pipelinerun           1 day ago       1 minute     Succeeded
$ tkn pr describe test-sidecar-pipelinerun
Name:              test-sidecar-pipelinerun
Namespace:         default
Pipeline Ref:      test-sidecar-pipeline
Service Account:   build-sa
Timeout:           1h0m0s
Labels:
 tekton.dev/pipeline=test-sidecar-pipeline

🌡️  Status

STARTED         DURATION    STATUS
5 minutes ago   2 minutes   Succeeded

📦 Resources

 NAME         RESOURCE REF
 ∙ git-res   git-res

⚓ Params

 NAME      VALUE
 ∙ image   harbor.k8s.local/course/tekton-demo

📝 Results

 No results

📂 Workspaces

 No workspaces

🗂  Taskruns

 NAME                                              TASK NAME        STARTED         DURATION     STATUS
 ∙ test-sidecar-pipelinerun-build-and-push-bmrpn   build-and-push   4 minutes ago   1 minute     Succeeded
 ∙ test-sidecar-pipelinerun-test-l4k2x             test             5 minutes ago   9 seconds    Succeeded
 ∙ test-sidecar-pipelinerun-get-build-id-r72xl     get-build-id     5 minutes ago   28 seconds   Succeeded
我们也可以看到很快就构建成功了:
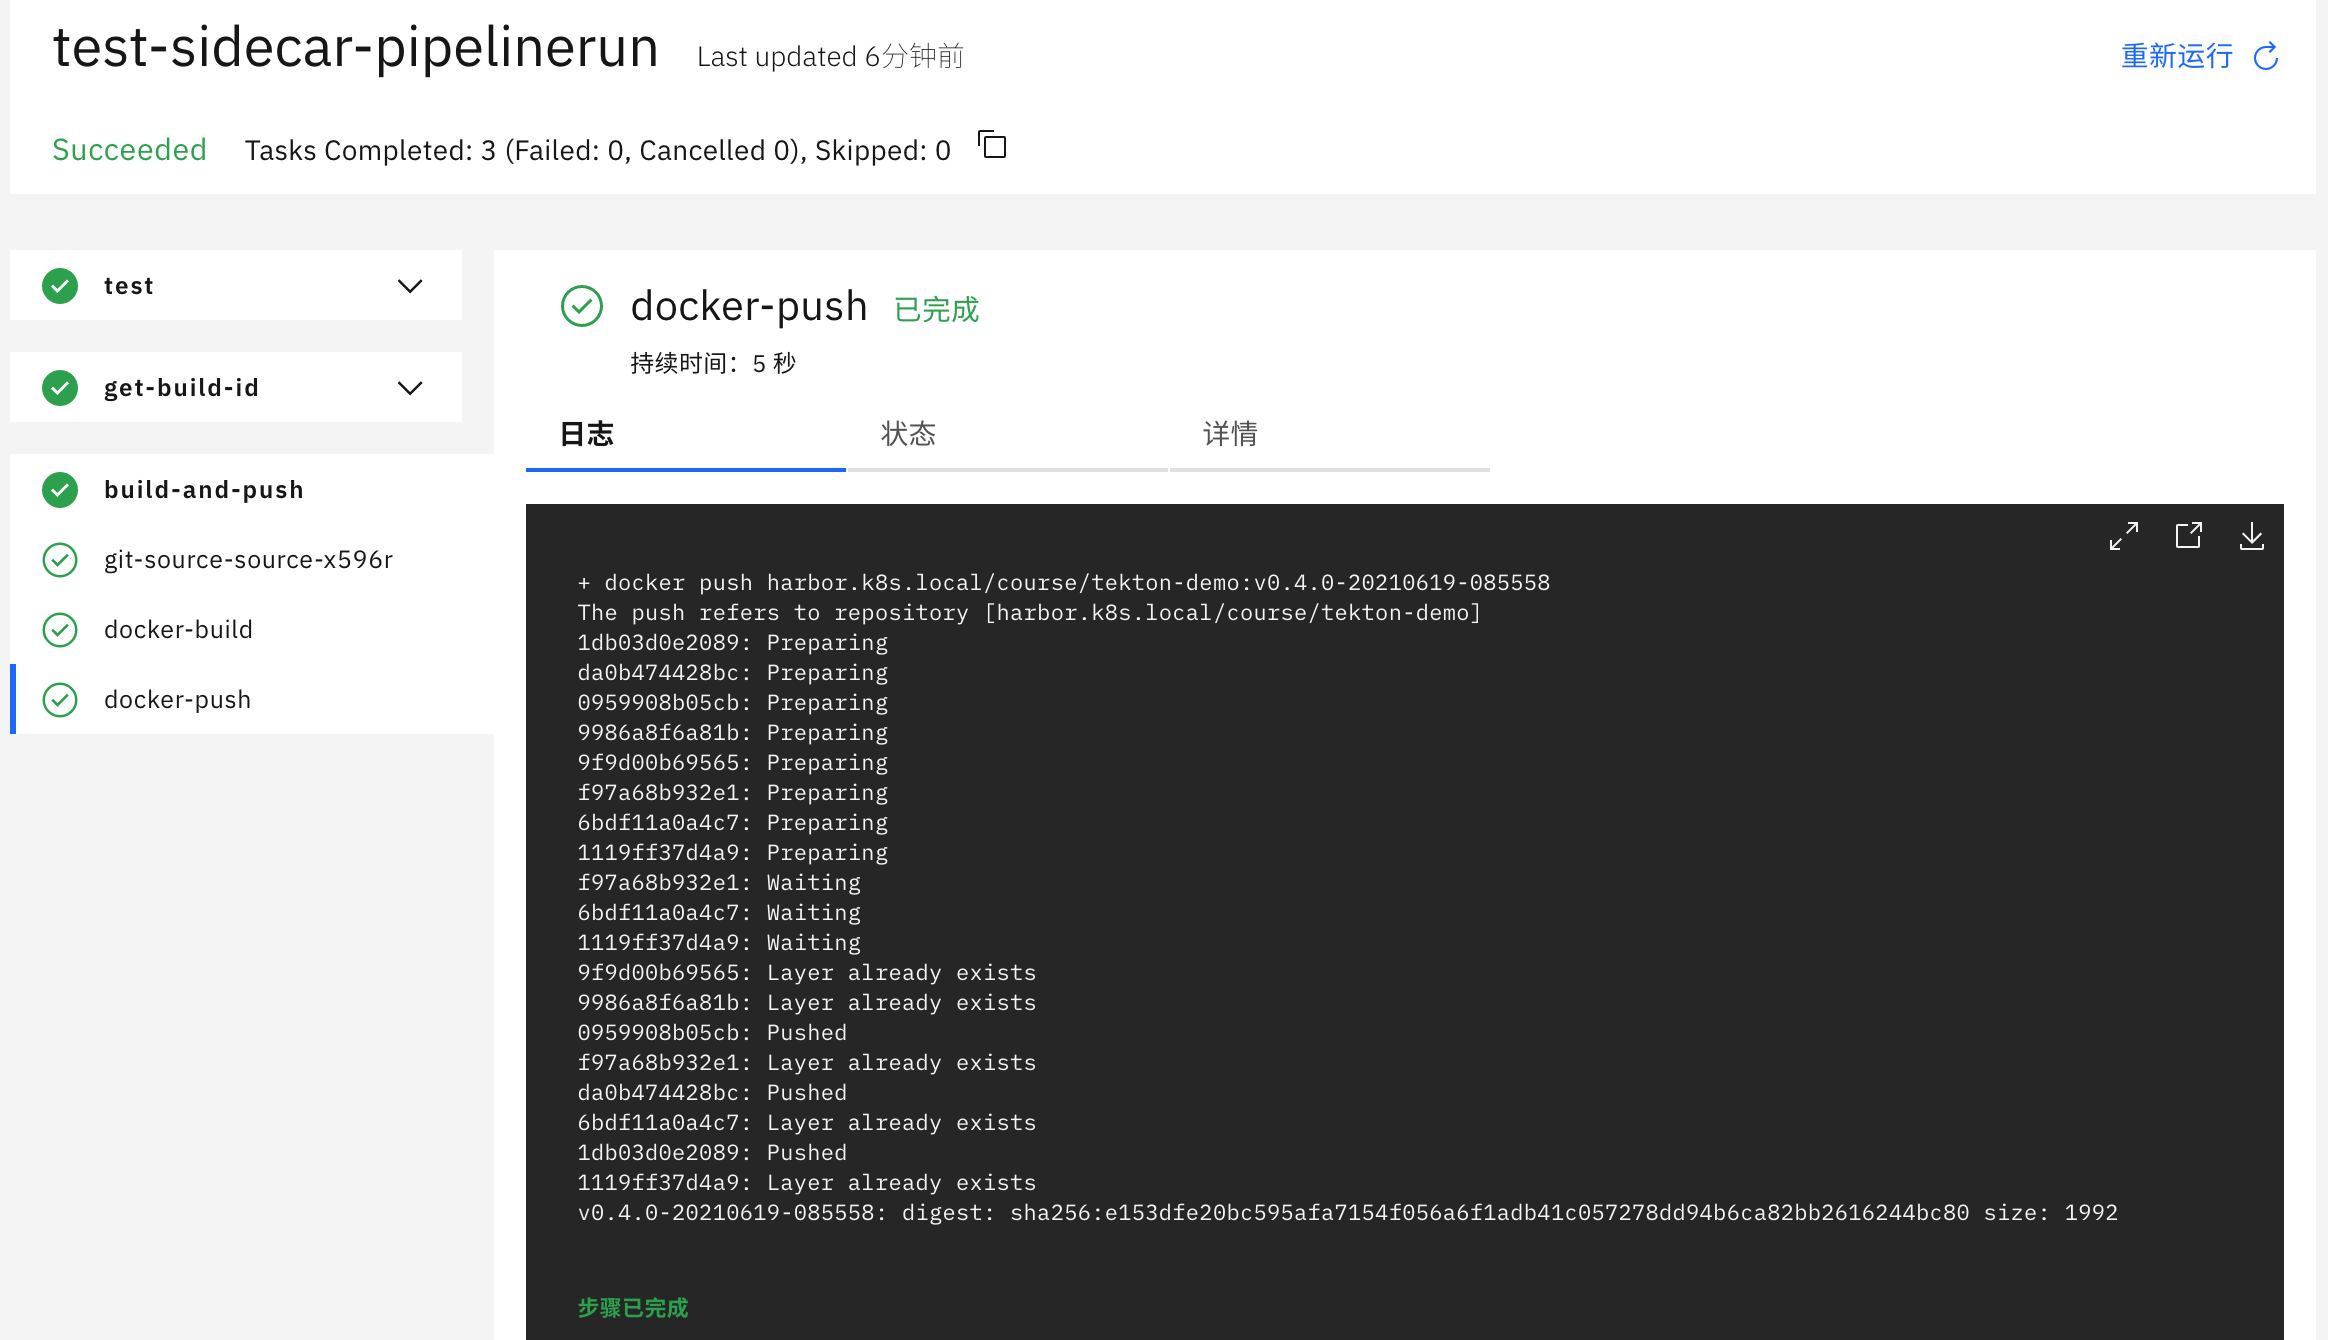
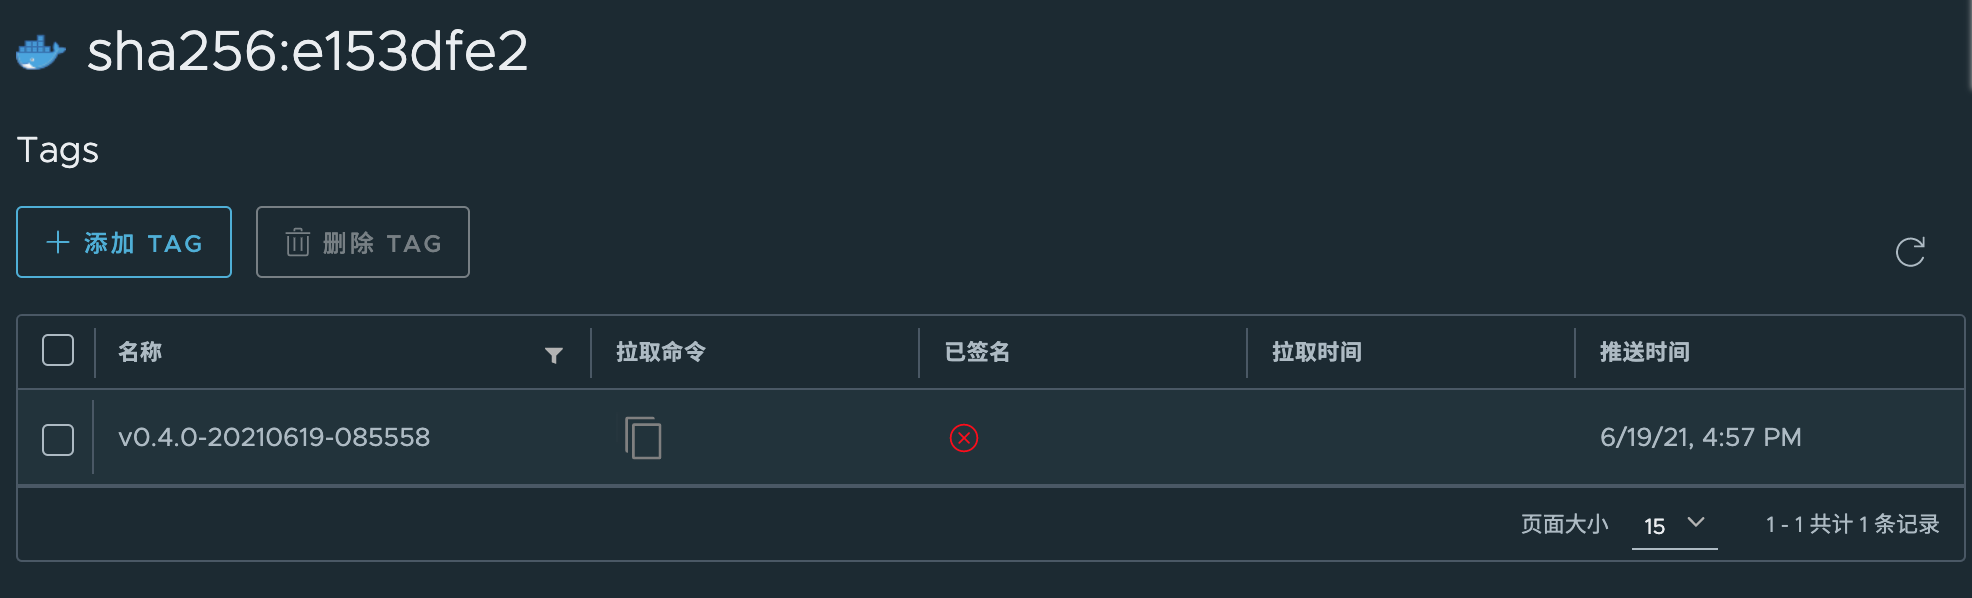
最终在 Harbor 中也可以看到我们刚刚推送的镜像版本:
这种方式还可以避免在宿主机上产生大量无用的构建过程产生的镜像,因为每次构建完成就销毁掉了,这才是真正的 Docker IN Docker,也是 Tekton 中的 Sidecar 的一个使用场景。
Workspaces
在实际工作中,我们经常需要的一个功能是能够在任务之间共享制品,以便缓存构建工具(比如 Maven 和 NPM)的依赖项,在 Tekton 0.10 版本就发布增加了对 Workspaces 的支持,这使得流水线中的任务可以更加轻松地使用 PV 来共享数据了,Workspaces 允许指定一个或多个 pipeline 中 task 运行时需要的 volume。
Tekton Pipelines 中的 Workspaces 是指流水线运行时需要的共享卷的声明,在流水线定义中,Workspaces 可以作为共享卷传递给相关任务,这样当为多个任务提供相同的 Workspaces 的时候,它们就可以从相同的 Volumes 中读取和写入数据。当然 Workspaces 的 Volumes 卷除了可以是 PVC,也可以是 ConfigMap,或者是在任务之间挂载和共享的 Secret 资源。
接下来让我们看看在实践中如何使用 Workspaces 来缓存 Maven 依赖,加速流水线的构建,这里我们使用的项目为:https://github.com/cnych/spring-petclinic。
要在流水线中构建 Maven 项目,当然需要定义一个 Maven 的 Task 任务,其实在 Tekton Catalog 里面就已经包含了这样的通用的 Task 了,但是这里我们需要对其进行一些修改来为 Maven 的依赖项添加 Workspaces 支持。
# workspace-mvn-task.yaml
apiVersion: tekton.dev/v1beta1
kind: Task
metadata:
  name: mvn-task
spec:
  workspaces:
    - name: maven-repo
  resources:
    inputs:
      - name: source
        type: git
  params:
    - name: GOALS
      description: The Maven goals to run
      type: array
      default: ['package']
  steps:
    - name: mvn
      image: cnych/cloud-builders-mvn:tekton
      workingDir: /workspace/source
      command: ['/usr/bin/mvn']
      args:
        - -Dmaven.repo.local=$(workspaces.maven-repo.path)
        - '$(inputs.params.GOALS)'
上面的任务中我们新增了一个名为 maven-repo 的 Workspace,该工作区规定无论何时运行该任务,都应该提供并配置一个卷来充当本地的 Maven 存储库,然后将工作区的路径传递给 Maven 命令,以便通过 -Dmaven.repo.local=$(workspaces.maven-repo.path) 命令将工作区的路径作为本地的 Maven 库,当然也可以配置 Workspace 挂载的路径,这里我们使用的是默认的路径。
接着我们来定义一个使用 Maven 任务构建 Java 应用程序的流水线 Pipeline,为了演示 Maven 依赖的缓存效果,这里的流水线我们运行 3 个 Maven 任务来执行构建、集成测试,并生成测试结果和代码覆盖率等报告。
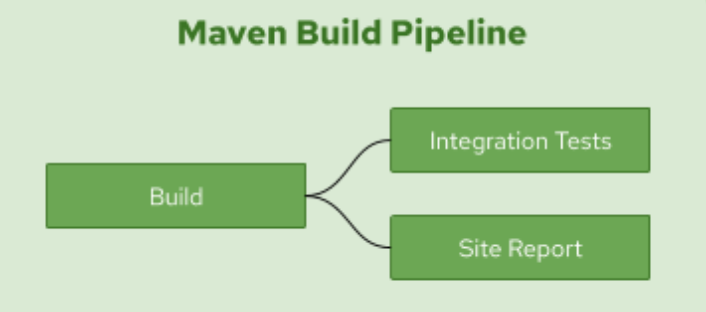
流水线定义如下所示:
# workspace-mvn-pipeline.yaml
apiVersion: tekton.dev/v1beta1
kind: Pipeline
metadata:
  name: mvn-pipeline
spec:
  workspaces: # 声明 workspaces
    - name: local-maven-repo
  resources: # 声明使用的资源
    - name: app-git
      type: git
  tasks:
    - name: build # 构建任务
      taskRef:
        name: mvn-task # 引用上面的 mvn 任务
      resources: # 传递 resources 资源
        inputs:
          - name: source
            resource: app-git
      params: # 传递 params 参数
        - name: GOALS
          value: ['package']
      workspaces: # 传递 workspaces
        - name: maven-repo
          workspace: local-maven-repo
    - name: int-test # 测试任务
      taskRef:
        name: mvn-task
      runAfter: ['build'] # 需要 build 任务执行完成后
      resources:
        inputs:
          - name: source
            resource: app-git
      params:
        - name: GOALS
          value: ['verify']
      workspaces:
        - name: maven-repo
          workspace: local-maven-repo
    - name: gen-report # 测试报告
      taskRef:
        name: mvn-task
      runAfter: ['build'] # 需要 build 任务执行完成后
      resources:
        inputs:
          - name: source
            resource: app-git
      params:
        - name: GOALS
          value: ['site']
      workspaces:
        - name: maven-repo
          workspace: local-maven-repo
需要注意流水线中的 local-maven-repo 工作区的声明,它指出,当此流水线运行时,应提供一个卷并将其用作此工作区,然后将此工作区提供给此流水线中的每个任务,以便它们都共享相同的工作区。然后我们根据传入的 GOALS 参数来决定应该执行的任务。
流水线 Pipeline 声明完成后,现在我们就可以运行这个流水线来构建 Spring PetClinic 这个示例应用了,在启动流水线之前,需要先创建一个 PVC 来提供一个 Workspace 对 Maven 依赖项进行缓存。
# workspace-mvn-pvc.yaml
apiVersion: v1
kind: PersistentVolumeClaim
metadata:
  name: mvn-repo-pvc
spec:
  resources:
    requests:
      storage: 5Gi
  volumeMode: Filesystem
  storageClassName: nfs-client # 使用 StorageClass 自动生成 PV
  accessModes:
    - ReadWriteOnce
这里我们使用了一个名为 nfs-client 的 StorageClass,这样就可以自动生成一个对应的 PV 进行绑定,如果你没有需要自行创建一个对应的静态 PV。
现在我们就可以创建一个使用上述 PVC 作为流水线工作区的 PipelineRun 来执行流水线了:
# workspace-mvn-pipelinerun.yaml
apiVersion: tekton.dev/v1beta1
kind: PipelineRun
metadata:
  name: mvn-pipelinerun
spec:
  pipelineRef:
    name: mvn-pipeline
  resources:
    - name: app-git
      resourceSpec:
        type: git
        params:
          - name: url
            value: https://github.91chi.fun/https://github.com/cnych/spring-petclinic
  workspaces:
    - name: local-maven-repo
      persistentVolumeClaim:
        claimName: mvn-repo-pvc
请注意 PVC 和为缓存 maven 依赖项而声明的工作区之间的映射,mvn-repo-pvc 被传递到流水线和相应的任务作为缓存文件和制品的共享卷。
第一次流水线运行将需要一些时间来下载依赖项执行任务,直接创建上面声明的几个资源对象,观察 PipelineRun 的执行过程:
kubectl apply -f workspace-mvn-task.yaml
kubectl apply -f workspace-mvn-pipeline.yaml
kubectl apply -f workspace-mvn-pvc.yaml
kubectl apply -f workspace-mvn-pipelinerun.yaml
当第一次执行流水线的时候会在执行 mvn 命令的时候消耗大量的时间,因为需要下载依赖包,我这里的环境差不多等了 20 分钟左右:
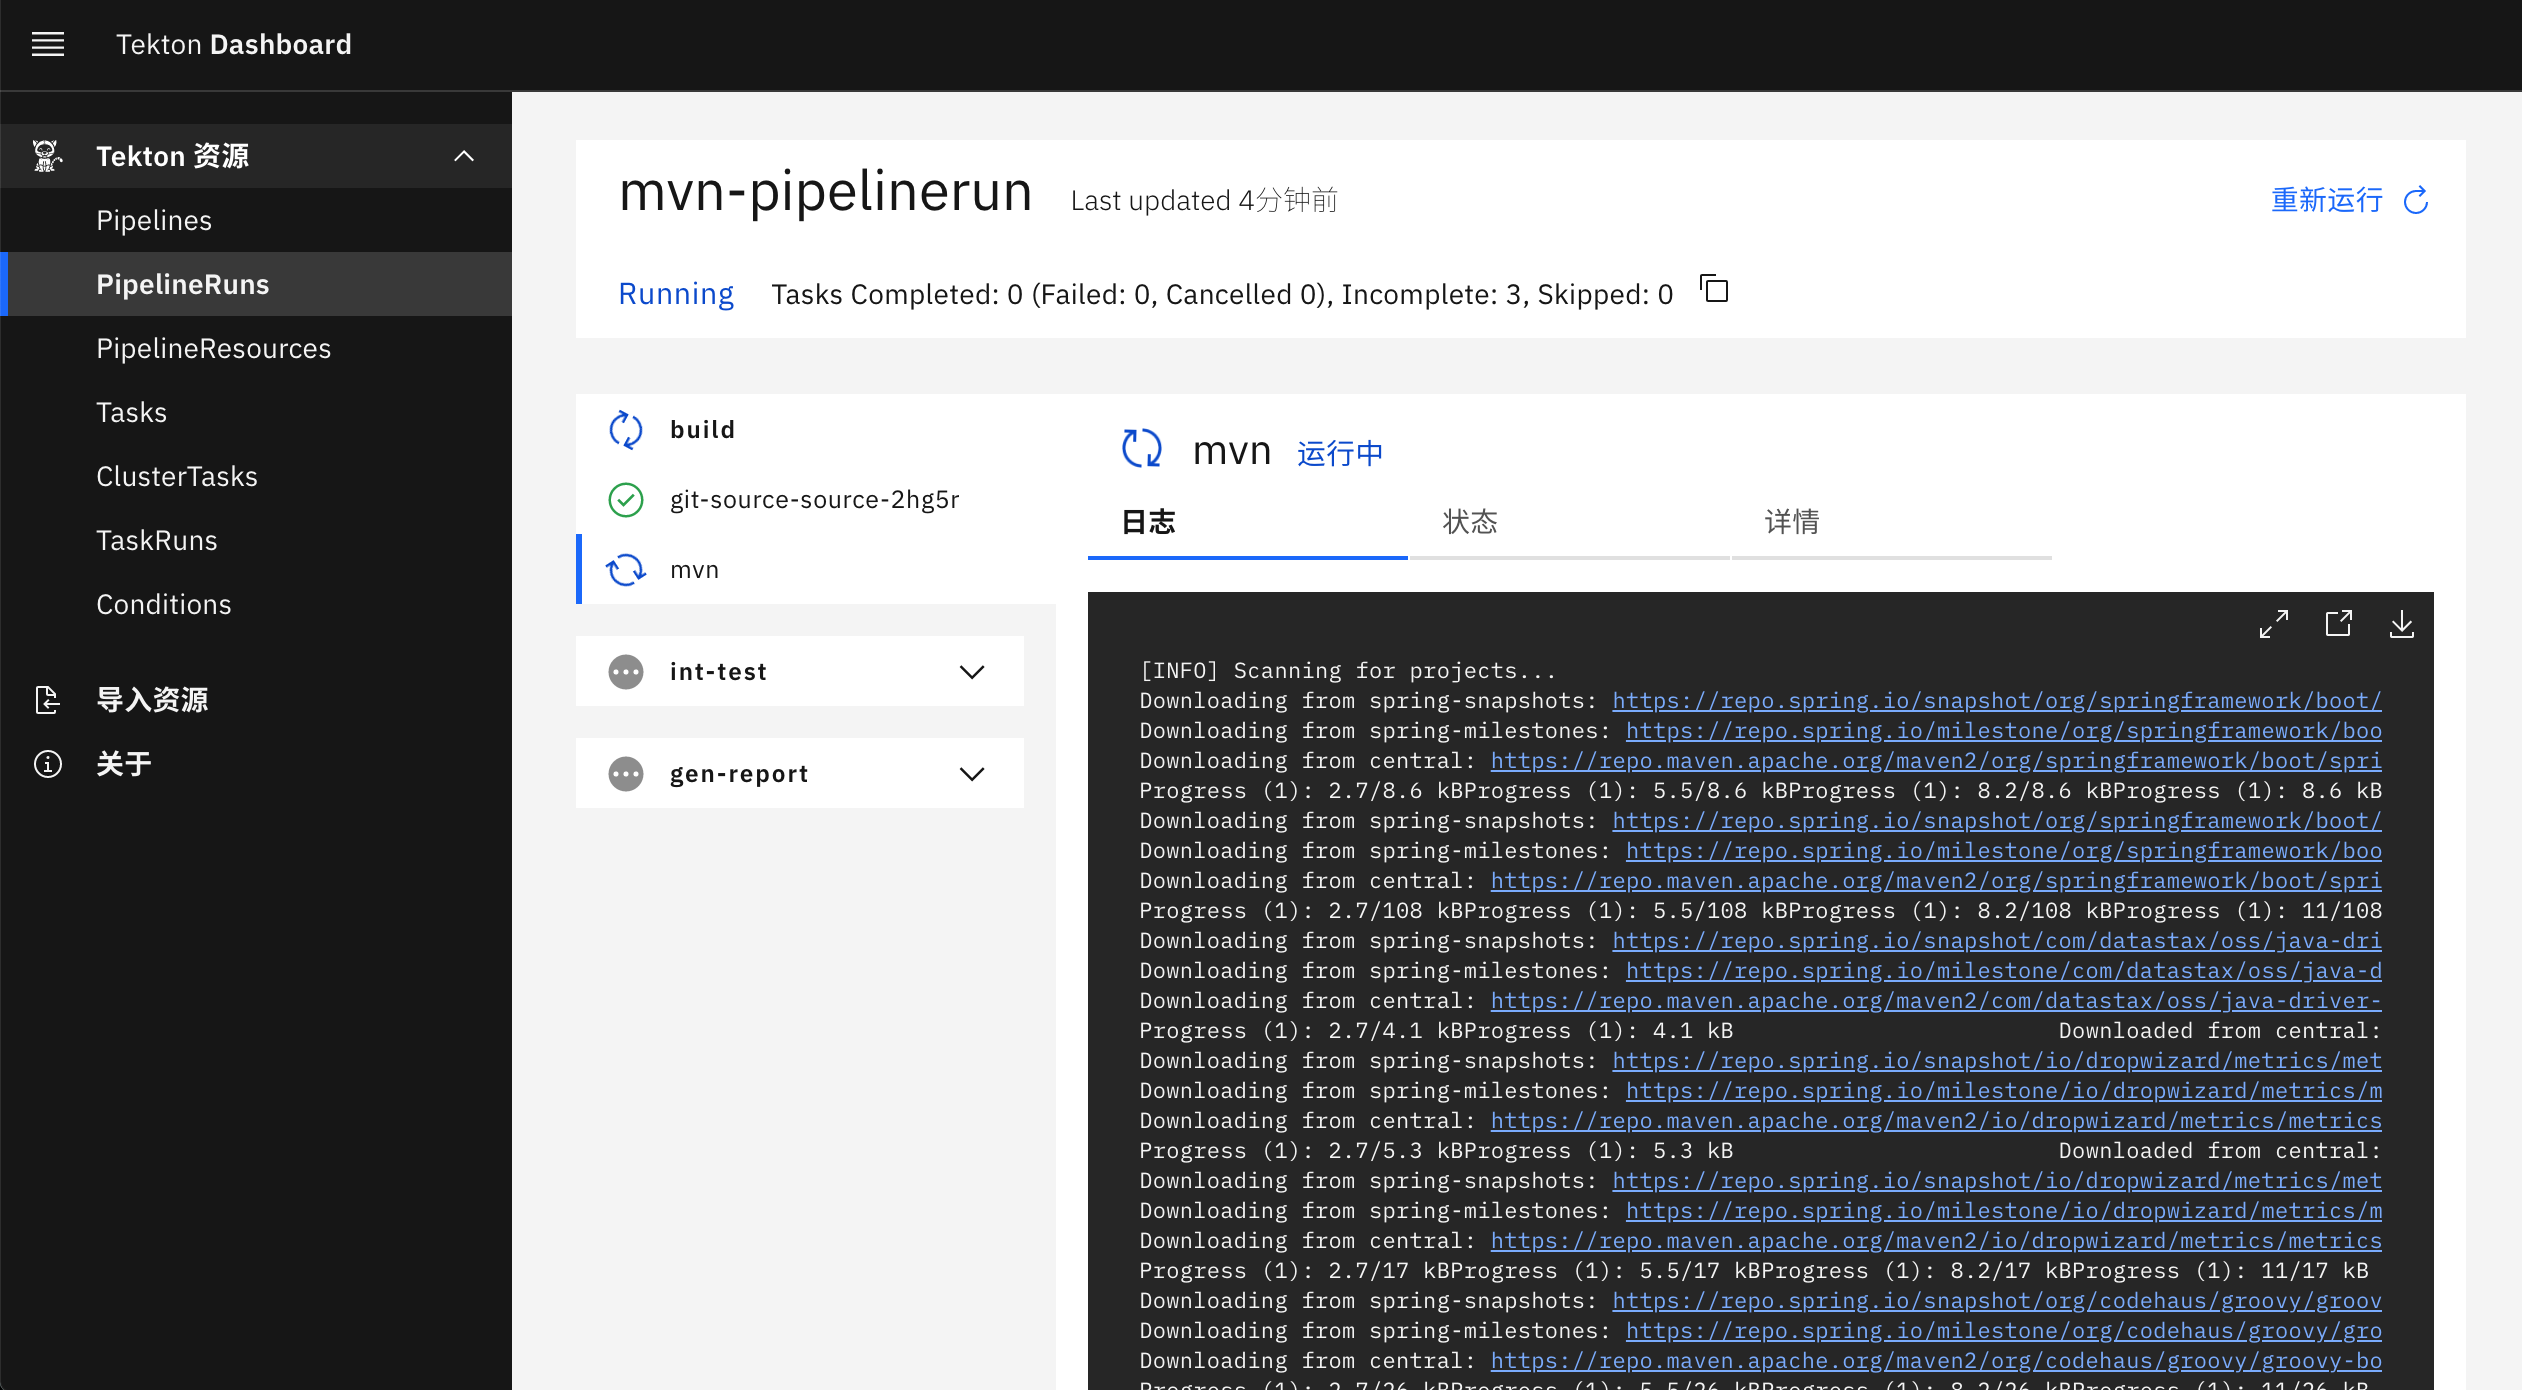
然后在执行后面的两个任务的时候就非常快了,因为前面任务执行完成后会把依赖项存入到 Workspace 声明的 PVC 中去,后面的任务直接使用了这个 Workspace,我们可以重新执行一次 PipelineRun,对比下前后两次的时间,在我的环境中,执行时间由 37 分钟减少到大约两分钟。
$ tkn pr list
NAME                      STARTED         DURATION     STATUS
mvn-pipelinerun-r-fgwf2   3 minutes ago   2 minutes    Succeeded
mvn-pipelinerun           2 hours ago     37 minutes   Succeeded
# 查看第一次pipelinerun的执行情况
$ tkn pr describe mvn-pipelinerun
Name:              mvn-pipelinerun
Namespace:         default
Pipeline Ref:      mvn-pipeline
Service Account:   default
Timeout:           1h0m0s
Labels:
 tekton.dev/pipeline=mvn-pipeline

🌡️  Status

STARTED       DURATION     STATUS
2 hours ago   37 minutes   Succeeded
......
🗂  Taskruns

 NAME                                 TASK NAME    STARTED       DURATION     STATUS
 ∙ mvn-pipelinerun-int-test-mbppx     int-test     2 hours ago   33 seconds   Succeeded
 ∙ mvn-pipelinerun-gen-report-xlns9   gen-report   2 hours ago   36 minutes   Succeeded
 ∙ mvn-pipelinerun-build-x9zkf        build        2 hours ago   20 minutes   Succeeded

# 查看第二次执行的详细信息
$ tkn pr describe mvn-pipelinerun-r-fgwf2
Name:              mvn-pipelinerun-r-fgwf2
Namespace:         default
Pipeline Ref:      mvn-pipeline
Service Account:   default
Timeout:           1h0m0s
Labels:
 reruns=mvn-pipelinerun
 tekton.dev/pipeline=mvn-pipeline

🌡️  Status

STARTED         DURATION    STATUS
4 minutes ago   2 minutes   Succeeded
......

🗂  Taskruns

 NAME                                         TASK NAME    STARTED         DURATION     STATUS
 ∙ mvn-pipelinerun-r-fgwf2-gen-report-n69g8   gen-report   4 minutes ago   1 minute     Succeeded
 ∙ mvn-pipelinerun-r-fgwf2-int-test-4g58z     int-test     4 minutes ago   32 seconds   Succeeded
 ∙ mvn-pipelinerun-r-fgwf2-build-ftqgr        build        4 minutes ago   38 seconds   Succeeded
测试任务运行没有受到太大影响,因为它使用了大部分在构建任务运行中下载的依赖项,即使在第一次流水线运行中也是如此。

我们可以看到利用 Workspaces 功能可以对我们的流水线构建进行大幅度的优化,特别是对于依赖包特别大的应用,比如 Maven、NPM、Go Modules 等。
Run
Run 允许你实例化和执行自定义任务,可以通过在集群上运行的自定义任务控制器来实现。自定义任务可以实现与在集群上的 Pod 中运行工作负载不直接对应的行为,对于基于 Pod 的集群工作负载,你应该使用 TaskRun。
为了让 Run 实际执行,必须有一个自定义任务控制器在集群上运行,负责监视和更新引用其类型的 Run。如果没有这样的控制器正在运行,则 Runs 将没有 .status 值。
自定义任务资源的 Spec 可以直接嵌入到 Run 中,也可以由 Ref 引用,但是,不能同时使用两者。
要指定要在 Run 中执行的自定义任务类型,请使用 ref 字段,如下所示:
spec:
  ref:
    apiVersion: example.dev/v1alpha1
    kind: Example